Introduction to git and version control
An intro to git and version control
Version control is an essential part of any modern software project, it is crucial for developers to use version control in their work or they will end up with a very messy working environment where backups of large files are created to start working on a new feature and if they accidentally delete any of these backups they may lose a large amount of their work and end up banging their head to the wall :)
This is only a glimpse of what version control can do for developers, in addition to that it helps them to create a very clear history of source code changes and make it easier for them to review what did they change and when did they change and why did they change, it can help them to easily collaborate with other developers around the world or in their team, it can be used to create a central repository to host your source code on github or gitlab
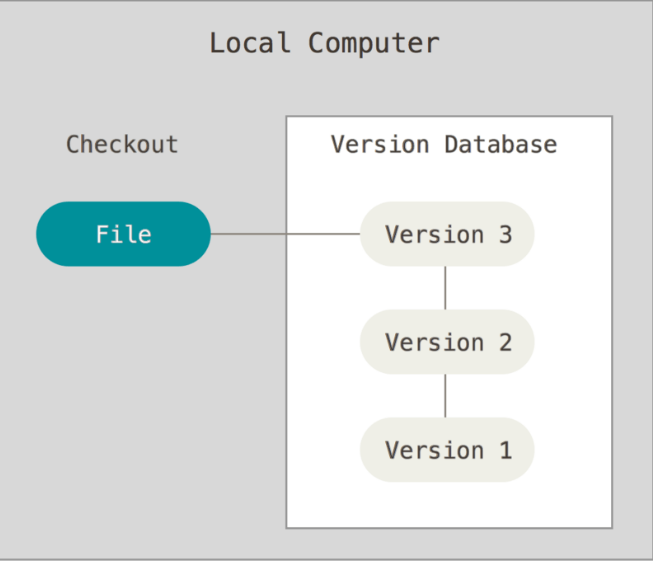
Version control systems keep copies of all changes made to your source code files and store them in a special database where you can review them, apply them on your working directory and store commit messages to describe these changes for you in the future.
The following figure shows a file versioned in the database:
I am not going to talk any more about the benefits of version control and leave it up to you to discover them while you read this article and learn git.
What is git?
git is the most popular version control system, it was created by Linus Torvalds the creator of Linux kernel to be used in Linux kernel development and later it was used by many organizations and developers around the world, of course git is free and open source.
git can be classified as distributed version control system in contrast with central version control systems which keep their database on central servers and developers just pull their files from the server to start working on their project, this has a lot of disadvantages:
- If the main server fails or crashes no body can work on their code and they may even lose their code.
- They need internet connectivity for nearly any operation they want to do with their code, like committing their changes.
- Storing the code in a central server requires much work to scale when new developers join the team and it needs disaster recovery plan and backups plans to make sure no data is lost.
A distributed version control system such as git overcomes all these problems, most of git actions can be done without an internet connection, the database holding the files and all their versions is distributed across the machines of all developers so there is no single point of failure here, also git can easily scale to hundreds or even thousands of developers because the load is not put on a single server, however there is a shared repository to share the code with other developers but even if this shared repository crashes or goes off-line it can easily be restored from any developer’s machine because they have the entire database on their own machines.
Okay enough literature and lets get to know git more closely.
How to install git?
If you are running Debian, Ubuntu or Kali you can install it by executing this command on your terminal:
sudo apt-get install git
If you are using Fedora, Red Hat or CentOS you can use this command:
sudo yum install git
If you are on Windows you can install it from here
To use it on Linux just open the terminal and execute the commands in the rest of this post, however on windows you need to open Git Bash and execute the commands there.
Git getting started
Before you start using git you need to identify your self to it by using these two commands:
git config --global user.email <your email address>
git config --global user.name <your name>
These two commands are used by git to identify the user who committed the code changes. You must be wondering what is a commit??
Commits are like checkpoints in git history they can be used to describe each change you make in terms of what did you do? and why did you do it? You do not need to specify how did you do it, this is the job of the comments in the source code.
Each commit has an author: the user who created it, date: when the commit was created and a message which is the most important part of the commit.
We will get back to commits after we create a small project using git.
Git creating a project
Create a directory where you want to store your project with the following command:
mkdir example-git-project
Enter this directory with: cd example-git-project
Now initialize an empty git repository with this command:
git init
This creates the skeleton of a git repository, a hidden directory called .git created in the project
directory, this directory contains some files and sub-directories which will form the git database where
all changes made to all files are stored.
Now try creating a new file called README.md with your favorite text editor, I like using atom
Add this line to the file as an example content you can add your own if you like
This is an example project which uses git for version control
now run git status and check the output, you will see something very similar to this
On branch master

Initial commit

Untracked files:
  (use "git add <file>..." to include in what will be committed)

	README.md

nothing added to commit but untracked files present (use "git add" to track)
We will talk about branches later, as you see there are untracked files which means git will not track and store the versions of these files in its database.
We can ask git to track these files using the add command like this:
git add README.md
Here I am asking git to track this file called README.md, now run git status again
to see the modified output
On branch master

Initial commit

Changes to be committed:
  (use "git rm --cached <file>..." to unstage)

	new file:   README.m
Good no more untracked files, we can see now Changes to be committed, this means that
git is waiting for us to commit the changes we made to this file and create a checkpoint in
history.
We can commit the changes with this command:
git commit -m "Add README.md"
Here we use -m to specify a commit message, in this case I chose Add README.md as commit
message to describe what did I do in this commit I could add more to describe why did I do it,
I will leave this to you when you start working on real projects.
Git branches
Branches is considered as the killer feature of git, it allows you to work on two different features or tasks at the same time without having to copy any files at all.
Git uses master as a default branch and we committed to this branch previously in this article.
To create a branch you can use this command: git branch task2 this command creates a new branch
called task2 and uses the current branch as its base, now switch to the new branch with this
command git checkout task2 and run git status to make sure you are on the new branch.
On branch task2
nothing to commit, working directory clean
As you can see, the output says On branch task2
Now you can do whatever you want on this branch to achieve task2 then when finished commit your
changes and go back to master branch with this command: git checkout master
Lets try to modify the README.md file as part of task2, make sure you are on task2 branch and
open the file and add the following line to its end
This is part of task2
Now run git status and check the output:
On branch task2
Changes not staged for commit:
  (use "git add <file>..." to update what will be committed)
  (use "git checkout -- <file>..." to discard changes in working directory)

	modified:   README.md

no changes added to commit (use "git add" and/or "git commit -a")
Try to commit now as we did before git commit -m "modify README file for task2" and check the output:
On branch task2
Changes not staged for commit:
	modified:   README.md

no changes added to commit
Now what is this??? It says no changes added to commit, back to git stats output for some help.
The output says no changes added to commit (use "git add" and/or "git commit -a")
This means that git did not stage (prepare) the changes you added to the file for committing them,
git always commits the last staged version of a file, to stage a file you can use the git add command
or as a shortcut you can use git commit -a to stage all changed files and commit them to git history.
Try this git commit -a -m "modify README file for task2" now it worked and the commit is created for you.
You can do whatever you want with your files and when you checkout master again you will be back on track exactly the same as the point you left off.
Lets try this run this command git checkout master and open your file, What do you see???
The second line is gone because it did not exist when you first created task2 branch, you can continue your previous work and it will not interfere with any of other branches.
Now you finished tour work on task2 and you want to merge it with master branch to deploy your application, this can be easily done with the following commands:
git checkout master
git merge task2
Now open the file to see the line you added on task2 branch, here git merges all your work on task2 branch to your master branch so you can continue to work on master with the results of task2 in it to use them in your code.
To make things clearer for you suppose task2 was about adding a new class to your project to run an algorithm and when you merge it with master you can use this class in your project.
Git history
Before I finish this article I will talk about git history, as I said earlier git is used to store the history of changes you make to your files, you can read this history with this command:
git log
commit 313b62fbdef2948592bba99ad32bcf45ba5b71b9
Author: Mohsen Ibrahim <mohsen47@hotmail.co.uk>
Date:   Fri Aug 25 23:49:36 2017 +0300

    modify README file for task2

commit 80737164042d573407e4c85086513b710150a03c
Author: Mohsen Ibrahim <mohsen47@hotmail.co.uk>
Date:   Fri Aug 25 23:25:31 2017 +0300

    Add README.md
Here you can see the author, the date and the commit message, the long string next to the word commit is the commit SHA hash, it is a unique identifier for each commit and can be used to checkout a commit which will make all the files look the same as when this commit was created.
You can add the -p option to show the changes presented by each commit, or use --oneline option
to show a short version of the history with the first seven characters of the commit hash and the commit
message next to them.
Conclusion
This article introduced you to git and its powers, there are many features in git which are not covered here.
To learn more you can try one of these resources:
- progit book found here
- Github interactive git tutorial found here
- Gitlab git university found here
- Atlasian Git tutorials found here
- You can also reach me on my email mohsen47@hotmail.co.uk for help, I welcome any requests for help.
I hope that you found this article useful contact me for questions, ideas or suggestions to make it better.