Run web tests using Locust Tests Runner
Introduction
Load testing your web server after you deployed your application is very very important to give you an idea about how your application will perform under heavy load, it also helps you in capacity planning and also configuring your web server for optimal performance.
In this article we will learn how to use locust to run load tests against our web server and also how to visualize the results, all of this using locust tests runner.
What will we do?
We will use locust tests runner to:
- Run a load test against google and facebook servers.
- Visualize the results and show them in an HTML page.
Locust Introduction
Locust is an Open Source load testing tool, you can use it to load test your systems regardless of their type, however it is primary used for web server testing.
The primary features of locust are:
- Define user behaviour in code: No need for clunky UIs or bloated XML. Just plain code.
- Distributed & scalable: Locust supports running load tests distributed over multiple machines, and can therefore be used to simulate millions of simultaneous users
- Proven & battle tested: Locust has been used to simulate millions of simultaneous users. Battlelog, the web app for the Battlefield games, is load tested using Locust, so one can really say Locust is Battletested ;).
To use locust first you need to install it with this command
sudo -H pip3 install locust
To use locust we must first create a file called locustfile.py, this file
describes the tests we want to run using python code, this is an example
of the file:
from locust import HttpUser, between, task
class WebsiteUser(HttpUser):
    wait_time = between(5, 15)
    host = "https://google.com"
    @task
    def index(self):
        self.client.get("/")
To run the tests use this command
locust
This will run an embedded web server which can be accessed using this url as shown here.

Enter the number of user, hatch rate and the host you want to test
and press Start swarming to start the load test, you can keep the
test running as long as you want and press Stop to stop it.
Running locust tests without the web UI and save results
You can run tests without using the web UI and save results to a CSV file using this command
locust --headless -u 100 -r 10 -t1m --only-summary --csv=output
Here is a description of the command line arguments:
- –headless: This switch disables the web UI and run tests immediately.
- -u 100: Run 100 users for the test.
- -r 10: This is the hatch rate, create 10 users every second until the number of users is reached.
- -t1m: This is the test duration, run tests for 1 minute.
- –only-summary: This switch disables showing stats continuously, and only show summary at the end.
- –csv=output: Save the stats in a CSV file which is starts with
output, it creates multiple files one of them is calledoutput_stats.csv.
After one minute the testing stops and you can read the results.
Run multiple tests using locust tests runner
Now we learned how to run a single test using locust and save results
to CSV files, next we will use a simple web page to display results
in charts.
First clone the repository and install dependencies using these commands
git clone git@github.com:mohsenSy/locust-tests-runner.git
cd locust-tests-runner
sudo -H pip3 install -r requirements.txt
The repository comes with two example files for locustfile.py
and tests.json, copy them using these two commands
cp locustfile.example.py locustfile.py
cp tests.example.json tests.json
We have already used locustfile.py, now we will show the structure of tests.json:
{
  "tests": [
    {
      "users": 10,
      "rps": 5,
      "time": "1m"
    }
  ]
}
This is a JSON file with a single key called tests and it has the value
of an array, each element of the array is a JSON object with these keys.
- users: The number of users to simulate in this test.
- rps: The hatch rate for this test.
- time: The duration for running the test.
We can define multiple tests here, and run them all.
Now make sure you have https://google.com in the host field
in locustfile.py file and also add these tests to tests.json file.
{
  "tests": [
    {
      "users": 100,
      "rps": 10,
      "time": "2m"
    },
    {
      "users": 200,
      "rps": 20,
      "time": "4m"
    },
    {
      "users": 500,
      "rps": 30,
      "time": "6m"
    }
  ]
}
This will run three tests, with the defined attributes and save results
to CSV files in a directory called google, use this command to run them
python locust_run_tests.py -n google
Once tests are done change https://google.com to https://facebook.com
and run tests again using this command
python locust_run_tests.py -n facebook
Once tests finish we can move to next step Visualize results.
Visualize results
After we ran the tests and saved results in folders with different names
we can use the supplied script called http_server.py to run a simple
server used to display results.
Run the server with this command
python http_server.py
Navigate to this url to display results as shown bellow.

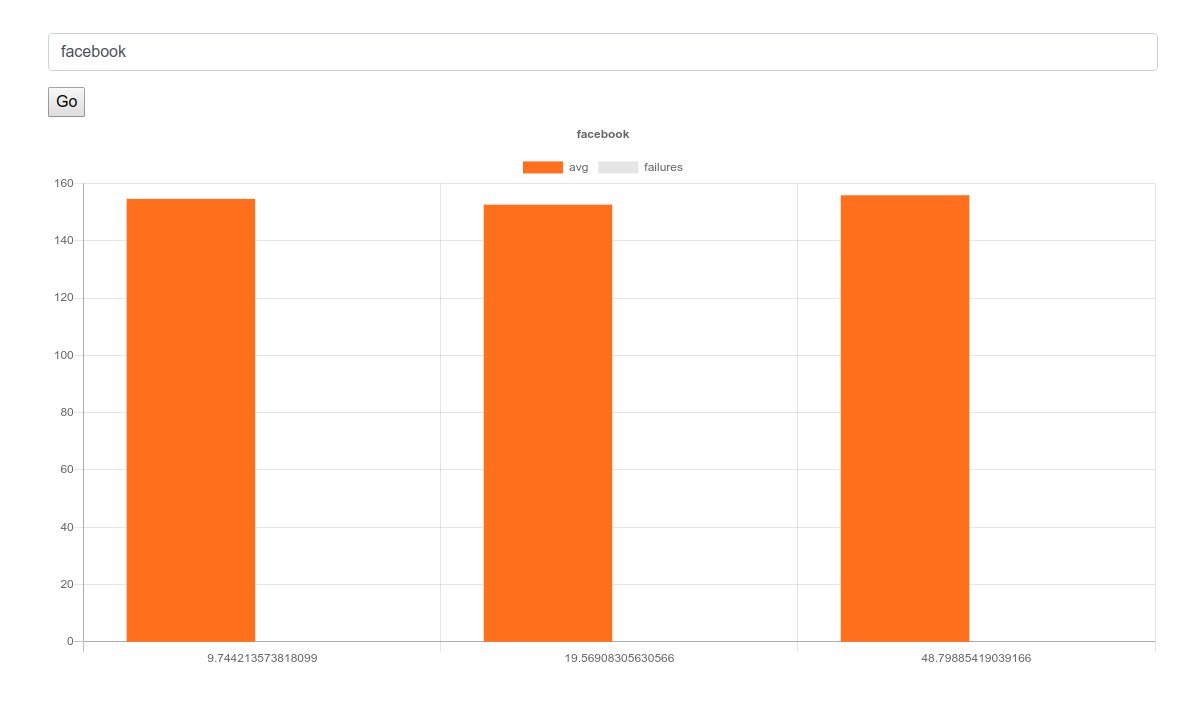
The previous images show results for facebook and google, we can see that facebook had a consistent average response time of around 154ms, while google started to give errors after the first test, but if we return to the errors we can see it is “429” response code, which is used to rate limit the number of requests to some routes, this is used as a protection by google to defend against attacks.
Conclusion
In this article we learned about the use of locust for load testing, and also the use of locust tests runner to run tests and visualize results.
I will work to improve the runner, to be able to define tests using a web interface and display and compare results easily using the interface.
I hope you find the content useful for any comments or questions you can contact me on my email address mohsen47@hotmail.co.uk
Stay tuned for more articles. :) :)