Git startup guide part 1
Introduction
In this article we are going to create a git repository on github then learn how to clone it, use checkout command and at the end we will look at the basic ways to undo our work with git.
Before we start you might be wondering what is github?
What is github?
Github is an online repository manager for git, with github you can create repositories, share them with the world and show your work to other people, but github is more than this and we will discover it in more detail later.
Hint There are other online repository managers such as gitlab and bitbucket.
Create repositories on github
Before you create a repository on github you need to sign up to a github account and login follow instructions on main github page here for more info.
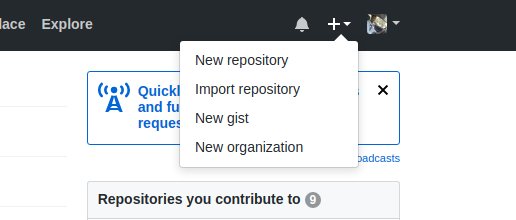
If you already have a github account then you can create a new repository by clicking
on the plus icon next to your profile picture found in the upper right corner of the screen
and choosing New repoitory as shown in the following screen shot.
Now you can see the the new repository page where you will set your repository name, Description, visibility and possibly add a README.md file and a .gitignore file with a license.
This screen shot shows the new repository page:
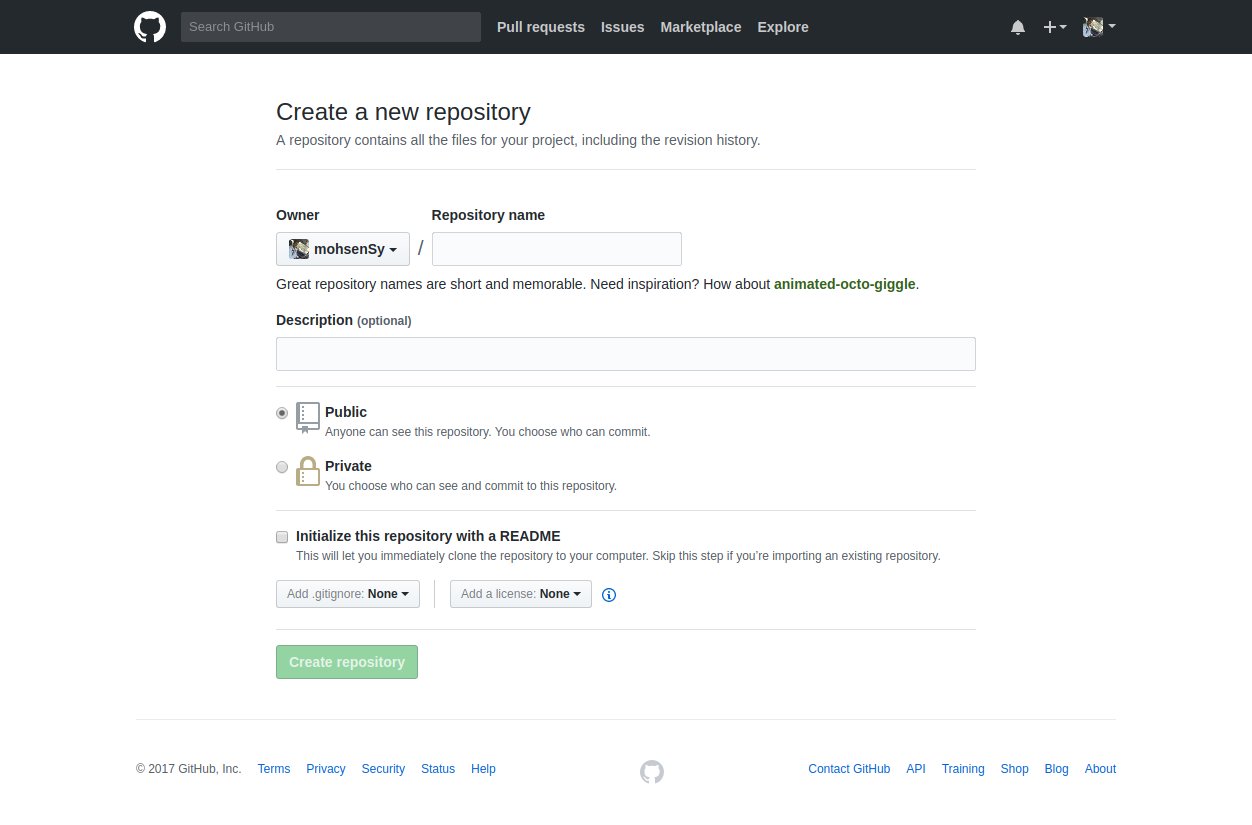
Enter test_repo as the name, Repo for testing git and github as a description and set the visibility to public and check Initialize this repository with a README then click Create repository.
Hint If you wanted to create a private github repository then you must upgrade your account to a commercial github account and pay money for that, for now we will use public github repositories for free.
Hint Gitlab offers the ability to create unlimited number of private repositories we will explore this later.
Hint a .gitignore file is a special file in git which is used to specify files that you want git to ignore them completely and not show them as untracked files, for example: compiled programs do not need to be version controlled only source files need, more info about .gitignore later.
Once you have created the repository you will see the main page of the repo as shown
in this screen shot
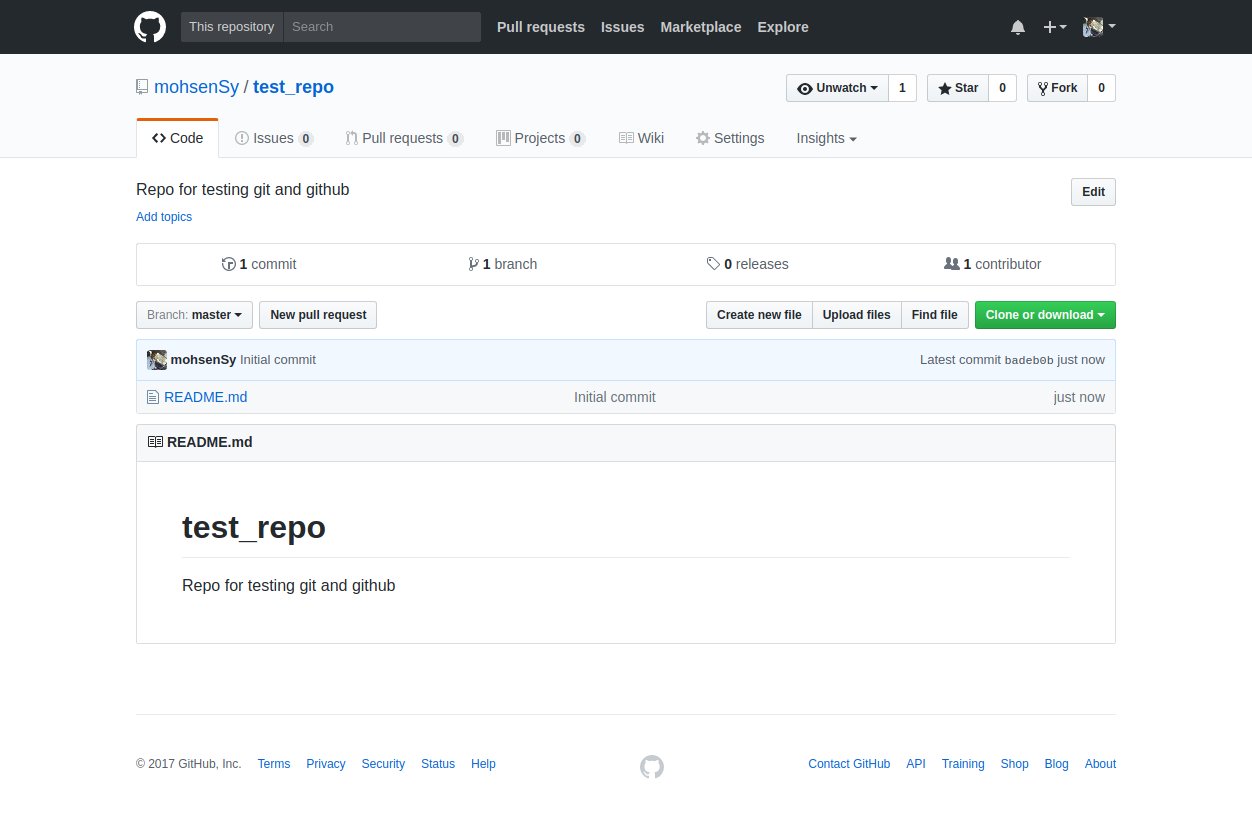
You see the README.md file displayed by default, it is very important to include this file in the root of your repo, it is the first file which is viewed immediately by anyone who enters your repo so take care of it to give a good first impression and encourage visitors to explore your repo and maybe contribute to it or use it.
Hint the .md extension marks this file as a markdown file, more about markdown can be found here and here.
Now since we created our first github repository it is time to clone it to your local machine and start working on it right away.
Cloning github repository
If you did not install and configure git please refer here for installing and configuring git.
If you are using Linux or MacOS then you need to execute the commands in the terminal, if you are using Windows then you must use Git Bash.
The first step to clone a repository is to get the repository url to be used when cloning the repo.
These two screen shots show you how to copy the url to clipboard.
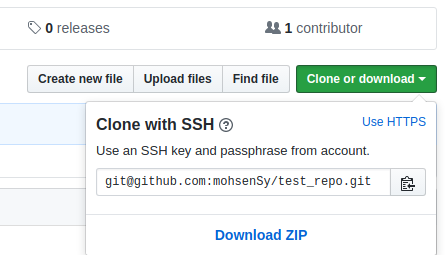
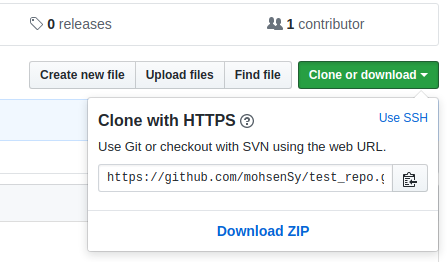
In the first image click on Use HTTPS and in the second one click on Copy to clipboard or manually select the url and copy it.
Hint We will learn more about SSH in a later article.
Now execute this command replacing the URL with your own one:
git clone <https://github.com/mohsenSy/test_repo.git>
Now you will see a new directory called test_repo enter this directory with
cd test_repo
If you type ls you will see the README.md file you just created, you can
freely modify its content.
Now if you modify its content and type git status what will you see???
You might expect to see something like this from the previous article:
On branch master
Changes not staged for commit:
  (use "git add <file>..." to update what will be committed)
  (use "git checkout -- <file>..." to discard changes in working directory)

	modified:   README.md

no changes added to commit (use "git add" and/or "git commit -a")
Actually you will see this:
On branch master
Your branch is up-to-date with 'origin/master'.
Changes not staged for commit:
  (use "git add <file>..." to update what will be committed)
  (use "git checkout -- <file>..." to discard changes in working directory)

	modified:   README.md

no changes added to commit (use "git add" and/or "git commit -a")
One line is different, the second one, what does this line mean?
This line says: Your branch is up-to-date with 'origin/master'.
origin is the name of the remote repository, when you cloned the github repository you created a local repository and added a link to the remote github repository it, this link is the same as the repository URL which you cloned and it is called origin by default.
This means that the master branch on your local repository is up-to-date with the master branch on the remote repository created on github.
You can commit your changes the same way you did in the previous article, can you remember the command used to commit??
checkout command
In the previous article we used branch and checkout commands to create branches and switch between them, in this article we will further explore the checkout command.
You can use checkout command to create and switch to a new branch in the same command use it like this:
git checkout -b new_branch
Do you know how to confirm that you created and switched to the new branch??
checkout command can be used on files too not just branches, let’s discover this feature.
Make sure you are on the new_branch with git status command, it should output
something like this:
On branch new_branch
Changes not staged for commit:
  (use "git add <file>..." to update what will be committed)
  (use "git checkout -- <file>..." to discard changes in working directory)

	modified:   README.md

no changes added to commit (use "git add" and/or "git commit -a")
The line which was added before to the output does not appear now because the remote repository on github does not have a branch called new_branch.
Let’s say you wanted to remove all the changes you added to README.md file and start editing it again, to do this you can use this command:
git checkout README.md
Now git status shows:
On branch new_branch
nothing to commit, working directory clean
Open README.md file you will see that every thing you added is gone.
To better understand the checkout command read the following:
checkout command can take two arguments the first one is the branch and the second one is the file/directory you want to checkout when there is no branch HEAD is used and when there is no directory/file . is used.
HEAD is the current branch and . is the current directory
When you use git checkout master you are changing HEAD pointer to point to the last
commit added to master branch and when you use git checkout README.md you change the
README.md file to exactly as it was on the current branch when you last committed it.
You might be wondering can I checkout a file to a different branch other than the current one??
Yes you can with this command:
git checkout <branch_name> -- <file_name>
I hope that my explanation is clear for more info check the official documentation, practicing will help too.
Undo your work
There are many situations in git where you make some mistake and want to undo it, in this section we will discuss some of the mistakes which you may make and how to correct them
- You might change some file and want to undo your changes and return the file to the state
where it was when you last committed it, to do this you can use checkout command:
git checkout file_name - You might stage some changes to commit them but remember that you do not want to stage them
to un-stage them you can use reset command:
git reset HEAD file_name - You might create a commit and after that you remember there is another file you need to edit and add it to the commit in this case you can edit the file and when committing changes use the –ammend option to add any changes to the last commit rather than creating a new one.
If you feel these examples are useless, you can discover their importance in next articles and when you start using git regularly.
Conclusion
In this article you learned the following:
- What is github and how to create a new repository and clone it using git.
- Using the checkout command.
- Basics of undoing your work using checkout and reset.
I hope you find the content useful for any comments or questions you can contact me on my email address mohsen47@hotmail.co.uk
Stay tuned for more articles. :) :)