Wordpress using Apache web server
Introduction
In the previous tutorial I showed how to install wordpress on Digital Ocean droplet and configure it to use Digital Ocean Managed Database service, we used a very simple and quickly setup, here we will explore more options to run Wordpress using the Apache web server.
Apache is a popular Web Server software, it is used to host many web applications around the world. Apache has a unique feature that enables it to run PHP scripts in its own process without calling an external server such as PHP-FPM, however we will find out that, this feature is not very good at all when it comes to serving many simultaneous requests as we will see in the next sections.
What will we do?
Here we assume you already have the previous Wordpress site created in my last tutorial which can be found here.
In this tutorial we will:
-
Create a droplet and install locustio for load testing our Wordpress site.
-
Explore the available modules for serving client requests in Apache server.
-
Run load tests for Wordpress site using different apache configurations and specify which one is the best for high performance.
At the end of this tutorial you are expected to configure apache web server for hosting Wordpress site and achieve the best performance.
Create a droplet with locustio
Using the Digital Ocean dashboard create a new droplet with the name wp-locust and 4 GB RAM and 2 vCPUs to use it for running load tests on Wordpress site.
locustio is a load testing tool written in Python, it can be used to load test any system as long as you have the right client setup in Python.
locust comes with built-in HTTP client that can be used for load testing web servers and applications, here we will install locustio and run a simple load test using it.
First execute these commands to install locustio on the new droplet
apt update
apt install python3-pip
pip3 install locustio
The first two commands updates the package repositories and installs pip3
which is used to install python 3 packages on the system.
The third command installs locustio python package on the system so we
can use it to run the load tests.
locust uses python code to define user behavior and runs multiple users to make requests to the web server, this makes it easier than other tools which use XML files to define user behavior.
We will create a simple locust file named locustfile.py with this content
from locust import HttpLocust, TaskSet, task, between

class WordPressTasks(TaskSet):
    @task
    def index(self):
        self.client.get("/wordpress")
    @task
    def login_page(self):
        self.client.get("/wordpress/wp-login.php")

class WordPressUser(HttpLocust):
    task_set = WordPressTasks
    host = "http://<wordpress_ip>"
    wait_time = between(5, 10)
In the previous file we have two classes, the first one is called WordPressTasks
which represents tasks performed by locust users, locust uses tasks
(methods decorated with @task) in this class to make HTTP requests to the server,
here we have two tasks the first one is a request to Wordpress main page and the
second one is a request to Wordpress login page.
The other class is WordPressUser and represents users in locust, here we specify
task_set class attribute that defines the class used to create tasks, also
the host class attribute holds the URL to the server and the wait_time specifies
how many seconds users wait before making another request.
Now to run locust testing we use this command
locust --no-web -c 500 -r 50 -t2m --only-summary --csv=500.50
- –no-web: runs locust without the web interface.
- -c 500: Simulate 500 users
- -r 50: This rate specifies how many users are added per second.
- -t2m: This means run the test for 2 minutes then exit.
- –only-summary: This means only show summary of tests when they end.
- –csv=500.50: This option tells locust to store results in CSV files, with names that start with “500.50”
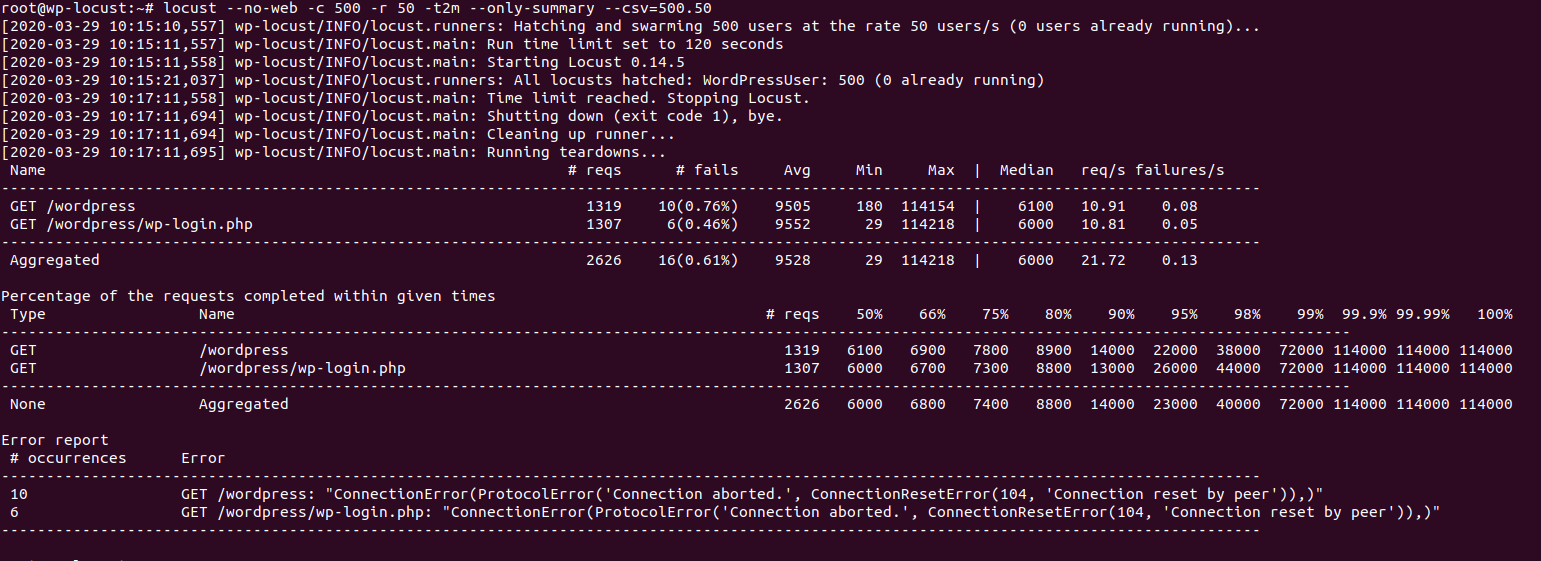
After you execute the command wait two minutes until it exits and check the results as shown in this image.

From the summary in the previous image we can see the following:
- The total average response time is 9528 ms which is 9.5 seconds.
- The total number of requests is 2626 requests.
- The number of requests per second is 21.72 req/s
- There were 16 failed requests, because of Connection Reset by the server.
From the previous summary we can see that the result is not acceptable at all, 9.5 seconds to just load the HTML part of the page (CSS and JavaScript files are not loaded yet) is not okay at all and our server will just go down once we have many users accessing our site, to improve performance we must understand how apache handles new requests in the next section.
Apache MPM modules
Apache uses Multi-Process Modules (MPMs) to handle new requests, each module specifies how a new request is served, some modules uses multiple processes to handle requests (prefork module), some others use multi-threading (worker module) and others use events (event module) to handle new requests.
To tell which MPM module you are currently using issue this command
a2query -M
You will get the result prefork for the Wordpress droplet.
Apache prefork MPM
This module preforks a number of apache processes to serve client requests, each request is served in its own process, and when more requests arrive than the number of processes, apache will create new processes to handle incoming requests.
This module is considered bad for performance in modern web applications, using a separate process for each request is very bad and requires a lot of server’s resources to serve requests, we saw the bad results in the previous section.
We will explore another MPM called worker in the next section.
Apache worker MPM
This module uses a thread to handle each new request, using threads
to handle requests causes little overhead compared to processes but
with this module we cannot use apache’s built-in PHP module to execute PHP
scripts because this module requires that each request is served in a separate
process as executing PHP scripts is not thread-safe which means that the
script may modify data shared by multiple threads without using any method
to synchronize access. To solve this we must use an external PHP server
such as PHP-FPM.
Installing PHP-FPM
You can install php-fpm with this command
apt install php-fpm
This will install the package php-fpm and start a PHP server and create
a socket in /run/php/php7.2-fpm.sock which can be used to communicate
with the PHP server from apache on the same host.
Use PHP-FPM in apache
In order to make apache use php-fpm to execute PHP scripts instead of its own php module, we need to execute these commands
a2enmod proxy_fcgi setenvif
a2enconf php7.2-fpm
The first one enables the proxy_fcgi and setenvif modules which are
needed for apache to communicate with PHP-FPM and the second one enables
PHP-FPM configuration to use php-fpm with php files.
Untill now apache still uses its own php module and the prefork module, to use the worker module we must first disable prefork and then enable worker, with these commands:
a2dismod php7.2 mpm_prefork
a2enmod mpm_worker
systemctl restart apache2
The first command disables the prefork MPM, we also disabled php7.2 because it relies on prefork to work and we cannot disable prefork and keep php7.2 enabled.
The second command enables the worker MPM and the last one restarts apache server to make changes take effect.
Apache event MPM
The event MPM was made stable only in apache version 2.4 and it offers significant performance boost (as we will see in the next section), this new MPM makes use of new kernel features to handle many requests concurrently and with very little resource consumption, all of this was made available thanks to the poll and epoll system calls, which enable user space applications to monitor multiple file descriptors and get notified when they are available for reading or writing.
The event MPM uses threads to serve requests, however it does not use a single thread per request, it uses a thread that listens to incoming connections and when a new connection is accepted it adds it to the epoll list and other idle thread will take the new connection from the list and serve it.
The event MPM also needs to use PHP-FPM server to execute PHP scripts, because it serves requests in threads not in separate processes.
To enable the event MPM use these commands:
a2dismod mpm_worker
a2enmod mpm_event
systemctl restart apache2
We first disable the worker MPM and then enable event MPM, notice that only a single MPM can be enabled at a time so we first must disable the enabled MPM then enable the new one.
Run load tests
Now after we learned about 3 of the most used apache MPMs we will restart the tests using these three configurations and check which one is better and gives lower response time and less errors.
To do these tests enable the right MPM in apache and execute this command
locust --no-web -c 500 -r 50 -t2m --only-summary --csv=500.50
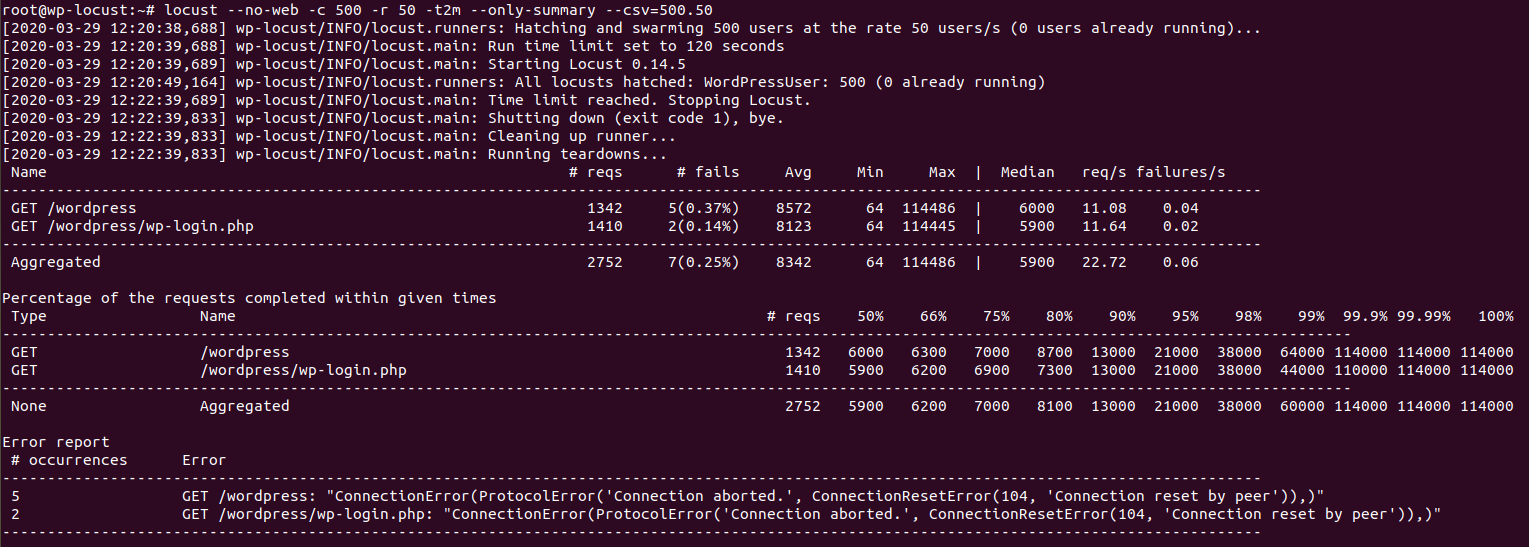
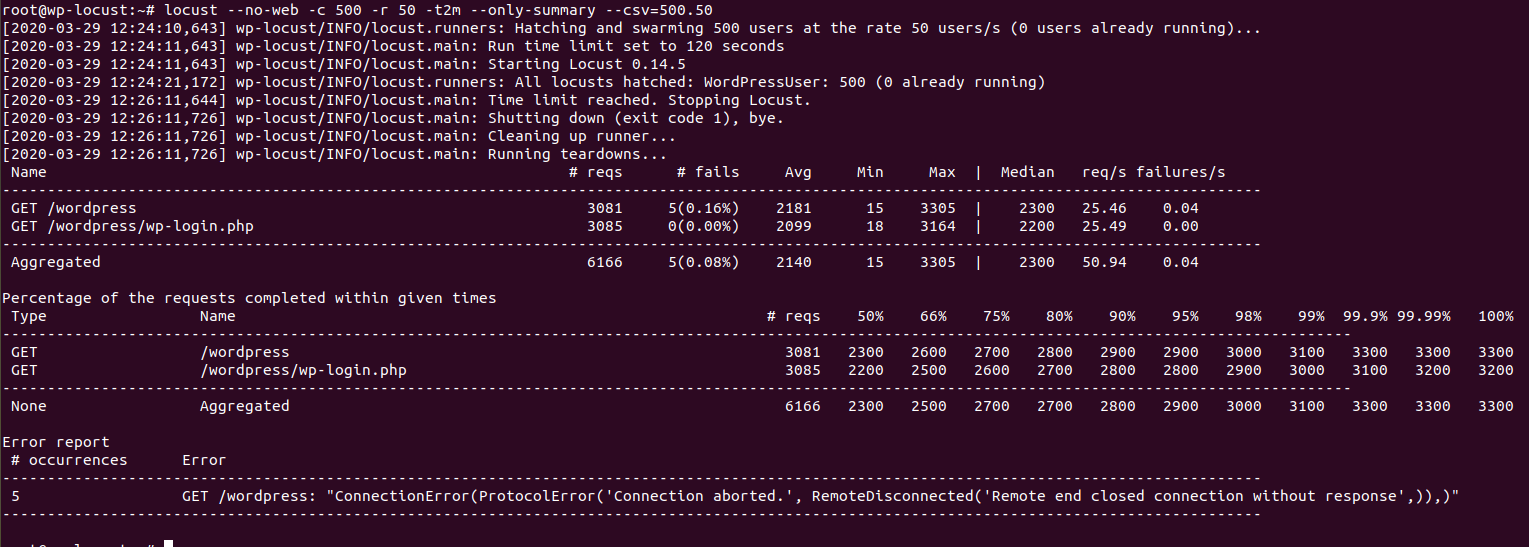
We described this command previously, the following two images show the results
for worker and event MPMs (results for prefork MPM were shown in the first section).

Results for worker MPM (average response time is 8.3 seconds, 7 errors, 22.72 req/s)
 Results for event MPM (average response time is 2.1 seconds, 5 errors, 50.94 req/s)
From the previous tests we can clearly see that the event MPM offers a very big performance boost compared to prefork and worker MPMs, worker MPM is slightly better than prefork MPM.
We can also see that the number of requests per second was a lot higher with event MPM which means it can handle more simultaneous users.
Conclusion
In this tutorial we learned how to use the right modules in apache to host Wordpress sites, we also used locustio to load tests Wordpress under different apache MPM modules.
Our tests show that prefork and worker modules are not suitable at all for high performance applications, and the use of event MPM improves the performance a lot when hosting Wordpress sites.
In the next tutorials we will compare apache with nginx server and also discover how to host Wordpress sites on multiple Digital Ocean droplets and load balance them using Digital Ocean load balancer service.
I hope you find the content useful for any comments or questions you can contact me on my email address mohsen47@hotmail.co.uk
Stay tuned for more articles. :) :)