Wordpress on Digital Ocean using Managed Database
Introduction
Wordpress is a popular Open Source blogging platform, it is written in PHP and actively developed and maintained, many users around the world use for their own blogs and to create simple websites to show their products, articles and the information they need to share with the world.
When Digital Ocean launched their new managed database service I wrote three articles about it, they can be found here and here and here.
When Digital Ocean added support for MySQL databases to its Managed Database service
I wanted to use it for running Wordpress blogs, however the only supported version
of MySQL database was version 8.0 which uses a new password encryption algorithm
called caching_sha2_password and the only PHP version that supports this was
version 7.4, so to use it we must update PHP to this new version.
This caused a lot of errors in Wordpress, also we cannot use phpmyadmin with this new version easily, I stopped trying to run Wordpress with the Managed Database service and used local MySQL server on the same or different droplets to run Wordpress.
Recently Digital Ocean added support to create MySQL users using the legacy encryption
algorithm called mysql_native_password, this means that we can easily create
mysql users and then use Wordpress with PHP version 7.3 or 7.2 with the
Managed Database Service, so I decided to write this article to help users
run their Wordpress blogs on Digital Ocean and benifit from the Managed Database Service.
What will we do?
In this tutorial we will:
- Create a droplet and install apache, php and Wordpress in it.
- Create a MySQL database cluster using Digital Ocean Managed Database Service.
- Create MySQL user on the Managed MySQL cluster using old native password encryption algorithm and grants it full access to a new Database for Wordpress.
- Point the Wordpress installation to use the new cluster as its own database.
At the end of this tutorial you are expected to run your own Wordpress server with help from Digital Ocean Managed Database which offers high availability, backups and fault tolerance with your intervention.
Create a droplet with Wordpress
Go to Digital Ocean dashboard and select new droplet as shown below

Choose a suitable size (here we select 2GB RAM and 1 vCPU), a region and a name
for the new droplet, also make sure to enable Private networking then click Create Droplet
Wait until the droplet is ready and connect to it using your SSH client.
Hint: You can check this page for more information about connecting using SSH.
Once you are connected over SSH, execute these commands:
apt update
apt install php apache2 php-mysql php-gd
The first one apt update, updates the APT repositories on the droplet to be able
to install all the needed packages.
The second one apt install php apache2 php-mysql php-gd installs apache2 and PHP
which are required to run Wordpress, php-mysql and php-gd are PHP extensions need
to run Wordpress too.
Now we can download the latest version of Wordpress with this command
wget wordpress.org/latest.tar.gz
After the file is downloaded we can extract it using this command
tar -zxf latest.tar.gz -C /var/www/html
chown www-data /var/www/html/wordpress
The first command extracts Wordpress in the /var/www/html directory and
the second one is used to give apache’s user ownership of the new Wordpress
directory, this is needed to enable the installation script to create the
wp-config.php file as we will see later.
Now after Wordpress is installed and ready we will move to MySQL cluster setup.
Create MySQL cluster
Wordpress needs a MySQL database to run, here we will create a MySQL cluster using Digital Ocean Managed Database Service and a MySQL user and database for Wordpress.
In the same way we created a droplet we can create a Database cluster, choose MySQL for the database engine, select the same region as the one we used previously and click Create a Database Cluster.
Meanwhile the cluster is provisioning we will setup some security for the cluster.
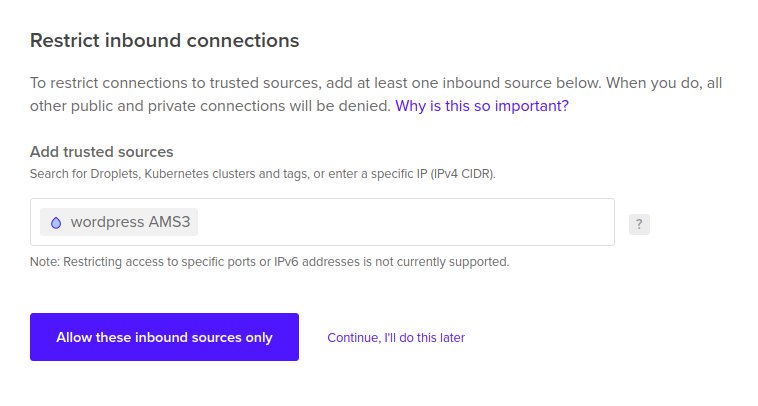
In the section secure this database cluster we can choose which IP addresses
can be used to connect to the database, since we will access this cluster from
our Wordpress droplet only we can select the droplet as shown in this picture and
click Allow these inbound sources only
Now we can connect to our database cluster only from the Wordpress droplet.
When the cluster has finished provisioning we can move to create a new database and user for the Wordpress, we can do this from the Users & Databases tab, as shown bellow.
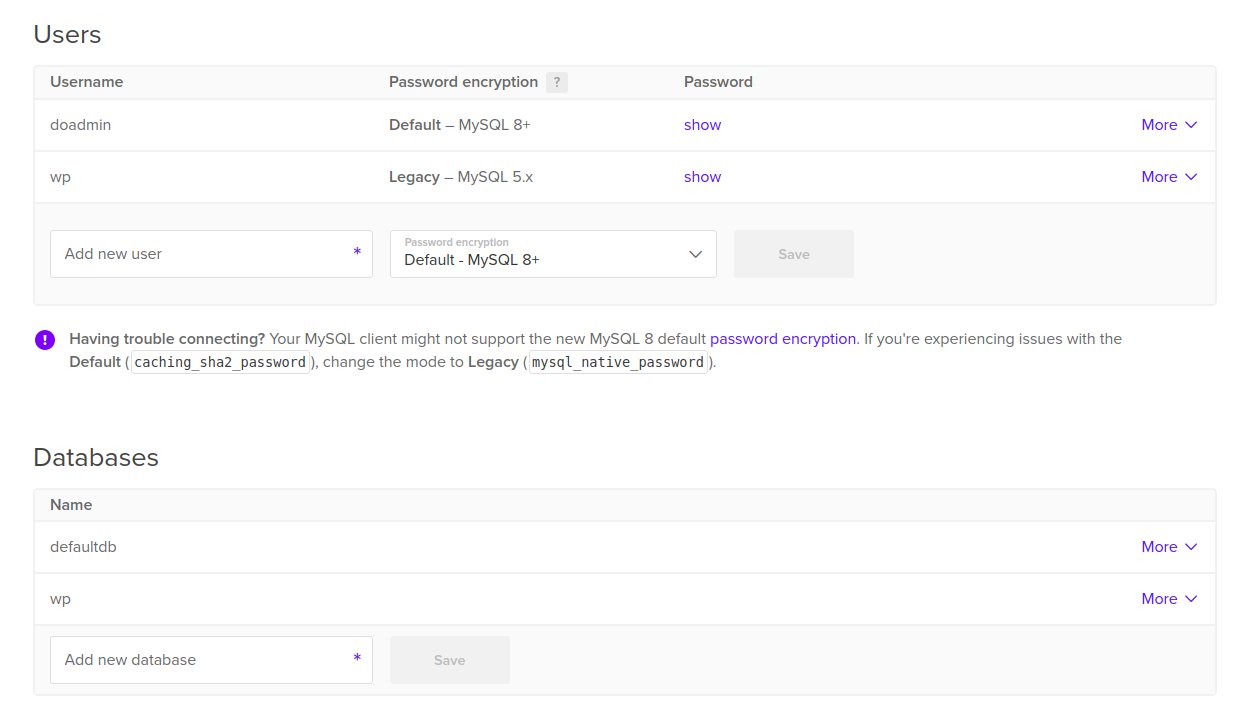
When creating a new user make sure to select legacy encryption algorithm to be able to connect to the database from Wordpress.
A random password will be generated, click show button and copy it somewhere
safe because you will need it later.
Now after our database cluster is ready we can move to run wordpress.
Run wordpress installation
Wordpress comes with a PHP file that can be used to create the configuration file needed to run wordpress and all the tables in the database.
Open this link http://<wordpress_ip>/wordpress in your browser, replace
wordpress_ip with the IP address of Wordpress droplet.
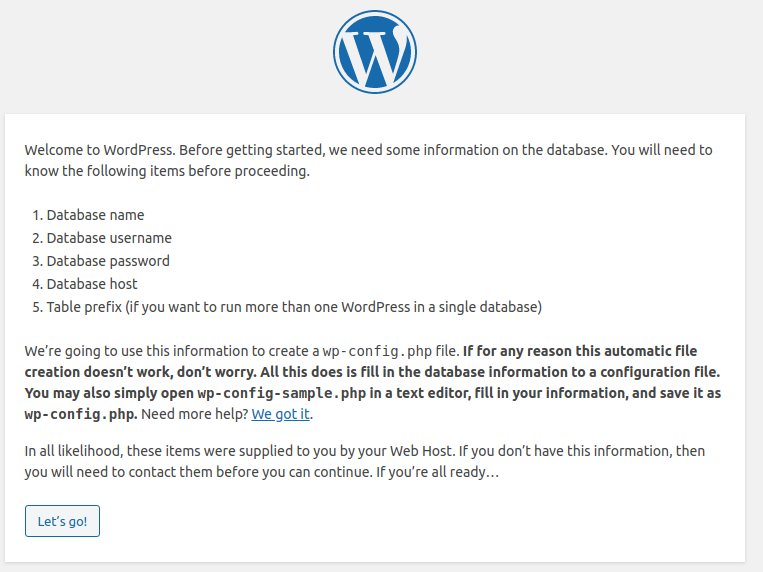
You will see this start page, click Let’s go.
Now you have this page, which asks for some input from you.
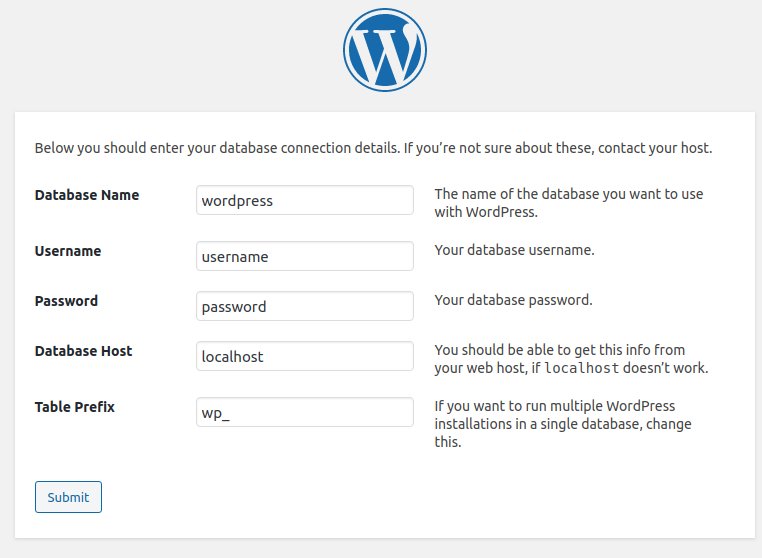
The database name is wp, you created it earlier in the previous step.
Input the username and password you created previously.
Now for the database host you need to get the hostname of your database cluster
from the cluster’s page, you can find it in overview tabe and Connection details
section, as shown here.
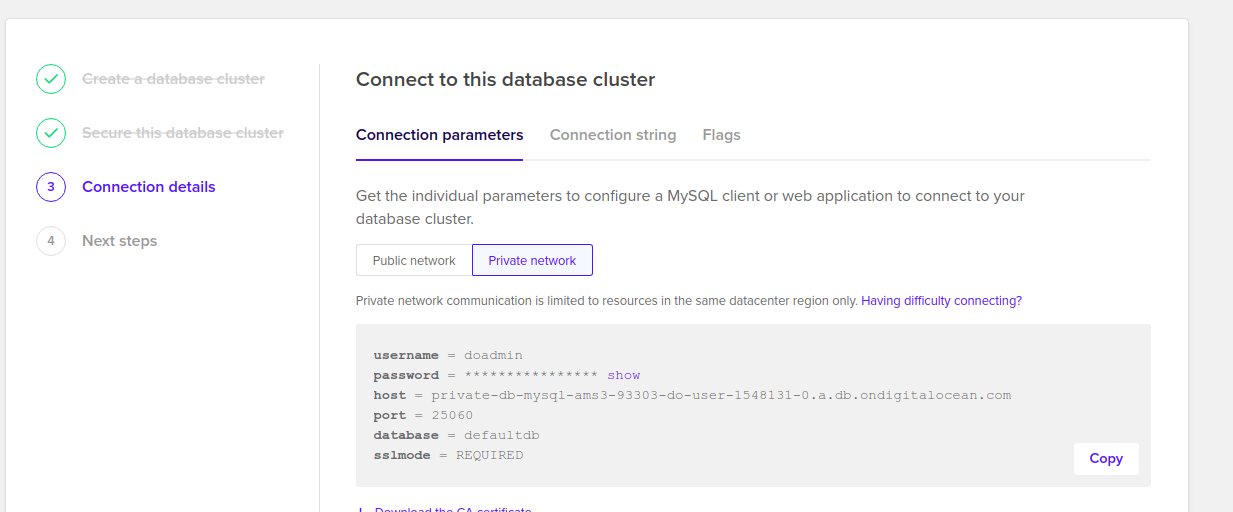
Make sure to select Private network to get the hostname used in Digital Ocean’s
private network, this will enable Wordpress to connect to the cluster using the private
network not the Public one.
Take the values for host and port and concatenate them together using a colon
and put them in the Database Host field in Wordpress installation page.
In our case here the Database Host will be private-db-mysql-ams3-93303-do-user-1548131-0.a.db.ondigitalocean.com:25060.
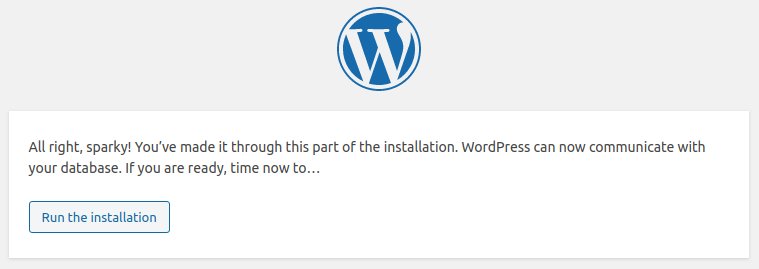
Click Submit in the installation page.
Now click Run the installation to start creating the needed tables
for Wordpress, after this you need to enter some information about your
site such as Title, admin username and password and your email address.
Enter them and click Install Wordpress to finish.
Conclusion
In this tutorial we learned how to create a wordpress site on Digital Ocean and use Managed Database Service to store the MySQL database needed by Wordpress.
We only ran through the basics to get you up and running quickly.
In the next tutorials we will learn about the best web server software to host Wordpress sites and how to configure them for high performance, so stay tuned for more.
I hope you find the content useful for any comments or questions you can contact me on my email address mohsen47@hotmail.co.uk
Stay tuned for more articles. :) :)