Securing Wordpress setup on Digital Ocean using Firewalls
Introduction
Previously we have shown how to host Wordpress site on multiple Digital Ocean droplets and use NFS for Shared Content storage and Digital Ocean Load Balancer to access the site, these tutorials can be found here, here and here.
The last tutorials did not mention anything about securing our infrastructure, we only wanted to have a Wordpress site up and running minimally, now we will explore how to secure access to our resources using Digital Ocean Firewall service.
What will we do?
This tutorial assumes you have completed the setup as described here.
In this tutorial you will
- Learn about Digital Ocean Firewall service and its uses.
- Use Digital Ocean Firewall service to add firewalls and apply them on Droplets.
- Secure NFS server using Cloud Firewalls
- Protect your FTP server using fail2ban.
Digital Ocean Firewalls
Firewall is a Digital Ocean Networking service, it can be used to restrict access to Droplets and Load Balancers using only the open ports, it makes it a lot easier to manage firewalls using this service because errors can be fixed easily, while if you manage firewalls manually on droplets you might lock your droplet in and need to reboot it or login via console to restore access.
Each firewall consists of these attributes:
- Inbound Rules: These rules apply for the traffic that enters the firewall,
in these rules we specify the allowed traffic, any traffic that does not
match is not allowed in, each rule has these attributes:
- Protocol: This specifies the protocol used for trafic it could be “tcp”, “udp” or “icmp”.
- Ports: Here we specify a port or range of ports for the allowed traffic, “80” means port 80 only, “1000-2000” means ports from 1000 to 2000 only.
- Sources: This is an object that specifies the allowed sources in, we will talk more about this object later on.
- Outbound Rules: These rules are applied for traffic that leaves the firewall, we specify allowed traffic out only and any other traffic is not allowed, each rule has Protocol and Ports just as Inbound Rules with a destinations object that specifies allowed destinations only.
In the sources and destinations attributes we have an object that specifies allowed locations (source or destination), there are 4 ways to specify these locations as follows:
- IP addresses: We can specify IP address in CIDR notation to allow traffic from or to this IP.
- Droplets: We can use the names of Droplets to allow traffic from or to Droplets by name.
- Droplet tags: We can use the tags applied to droplets here which means any droplet tagged with this tag will be allowed.
- Load Balancers: we can use the IDs of load balances here to allow traffic from or to a load balancer.
In the following screenshot we can see the Firewall creation page with all previous attributes.
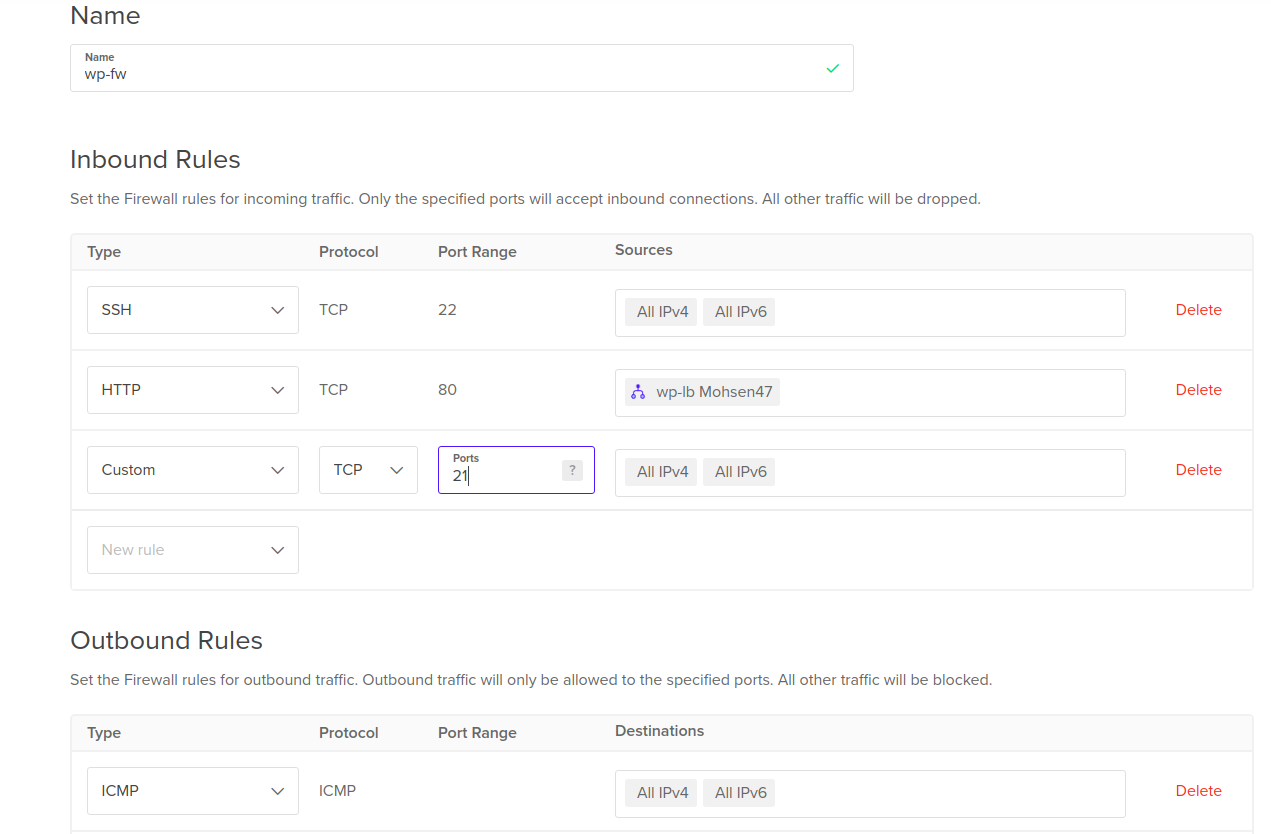
By default we have one inbound rule to allow SSH traffic in, three outbound
rules to allow all kinds of traffic out (tcp, udp and icmp).
We need to add two inbound rules, one for allowing HTTP traffic in on port 80
from the load balancer only and the other is to allow FTP traffic in on port 21
from all IP addresses then we need to specify the name of the firewall then
click Create Firewall button.
Apply firewall to droplets
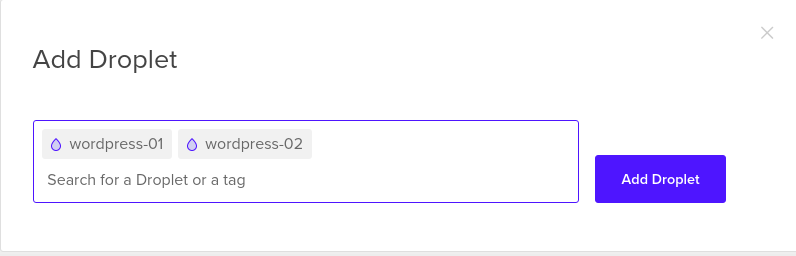
Now after we created the firewall, we can see that the firewall’s page, Droplets
tab is empty, as this firewall is not assigned any droplets to it, to assign
droplets to it click Add Droplets button, here you can select droplets by name
or by tag, as shown in the screenshot.
Secure NFS server using Cloud Firewalls
Now we still have the NFS server without any firewall, externally we only need to expose the SSH port so we can connect to the server remotely, however NFS server uses many ports to serve its clients, we need to specify which ports are used by NFS server and allow access to these ports from Wordpress droplets only.
Login to the NFS droplet and open this file /etc/default/nfs-common, look
for this line and change it as follows
STATDOPTS="--port 32765 --outgoing-port 32766"
This will tell the statsd RPC daemon to use ports 32765 and 32766 to serve clients, this daemon is used by NFS server.
Open this file /etc/default/nfs-kernel-server and look for this line
and change it as follows
RPCMOUNTDOPTS="--manage-gids -p 32767"
This will tell the mountd RPC daemon to use port 32767 when listening to client requests.
Now create this file /etc/default/quota and add this content to it
RPCRQUOTADOPTS="-p 32769"
This port will be used by quotad RPC daemon.
Finally create this file /etc/sysctl.d/nfs-static-ports.conf and add this
content to it
fs.nfs.nfs_callback_tcpport = 32764
fs.nfs.nlm_tcpport = 32768
fs.nfs.nlm_udpport = 32768
Apply the last changes and restart NFS with these commands
sysctl --system
systemctl restart nfs-kernel-server
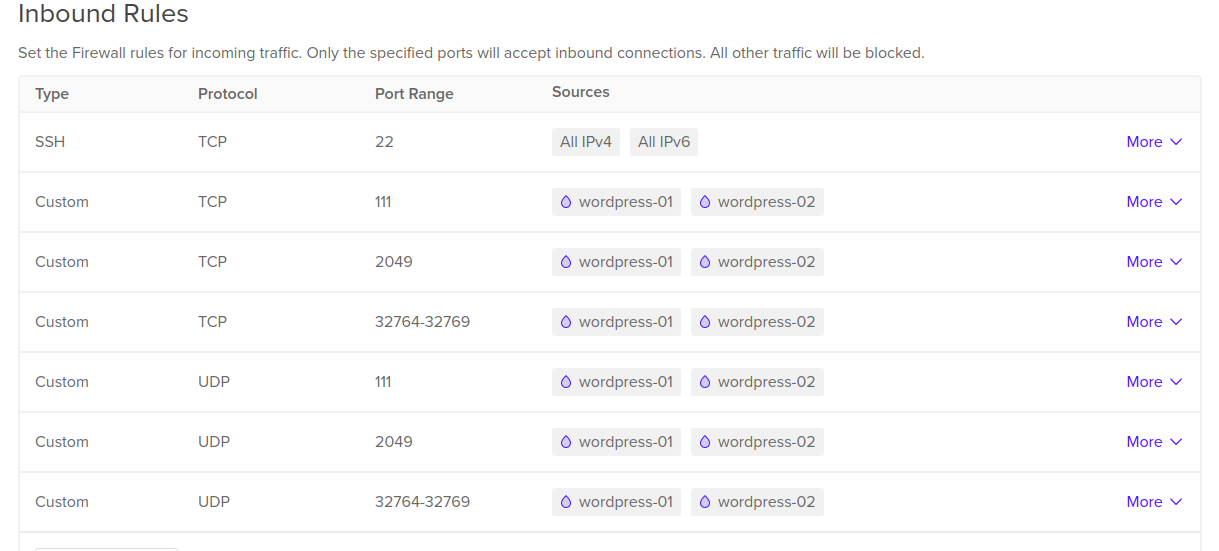
After all of this is done, we can create the firewall for NFS server, allowing these ports in:
- Port 22 from all IPs for SSH.
- Port 2049 (tcp and udp) from Wordpress droplets.
- Port 111 (tcp and udp) from Wordpress droplets.
- Ports [32764-32769] (tcp and udp) from Wordpress droplets.
This screenshot shows the required configuration
Protect FTP using fail2ban
fail2ban is a software that can be used to ban IP addresses based on their behavior when trying to connect to our server, for example if someone tries to guess the password for FTP user using brute-force or using multiple failed attempts we must ban this IP and this is done automatically by fail2ban.
To install fail2ban use this simple command on the wordpress droplet where FTP is installed
apt install fail2ban -y
After fail2ban is installed copy its main configuration file using this command
cp /etc/fail2ban/jail.conf /etc/fail2ban/jail.local
Open the new file and look for this section [vsftpd] then add this line
as follows
[vsftpd]
# or overwrite it in jails.local to be
# logpath = %(syslog_authpriv)s
# if you want to rely on PAM failed login attempts
# vsftpd's failregex should match both of those formats
port     = ftp,ftp-data,ftps,ftps-data
logpath  = %(vsftpd_log)s
enabled = true
After you change the file restart fail2ban server to apply new changes using this command
fail2ban-server restart
Make sure changes are applied with this command
fail2ban-client status
It should output something like this
Status
|- Number of jail:	2
`- Jail list:	sshd, vsftpd
Which means that SSH and VSFTPD jails are enabled, SSH was enabled by default.
Now if you try to access your FTP server using wrong username/password
multiple times you will get banned from connecting and get connection refused
errors.
You can also secure access to your Droplets using OpenVPN access server as described here, this method allows us to completely hide our droplets from the public internet and access them securely from the OpenVPN server by using their private IP addresses.
Conclusion
In this tutorial we learned how to secure your wordpress setup using Digital Ocean firewalls, this included applying firewalls to Wordpress droplets to allow HTTP traffic to it from the Load Balancer only, we also applied the right firewall rules to protect nfs server from accessing it outside the Wordpress droplets and finally we used fail2ban to protect our public FTP server.
In the next tutorials we will explore capacity planning for our Wordpress sites on Digital Ocean and also learn how to automate all of this stuff using terraform and ansible.
I hope you find the content useful for any comments or questions you can contact me on my email address mohsen47@hotmail.co.uk
Stay tuned for more articles. :) :)